Archive for the ‘Woocomerce’ Category
WooCommerce API: What Is It & When You Should Use It?
January 17th, 2024WooCommerce For Businesses: Benefits & Features
March 11th, 2023WooCommerce Development: Cost And Factors Affecting It!
March 7th, 2023What Is WooCommerce: A Complete Guide For Beginners
February 13th, 2023How Does WooCommerce Work?
February 10th, 2023Woocommerce Vs Shopify: Who Wins The Battle?
December 3rd, 2022How To Integrate Stripe With WordPress Via WooCommerce
July 15th, 2022When running an online store, you need a reliable and effective payment solution. If you are using WooCommerce with your WordPress site, then there are a handful of payment gateways that you can use. Gone are the days, when people used to struggle with the right payment solution integration. Nowadays, you have multiple choices when selecting a payment gateway to power your online store.
In this guide, we are going to discuss how you can integrate Stripe payment gateway with WordPress via WooCommerce. You must know that WordPress offers multiple options these days to power your online store. Whether you are trying to add a payment solution or trying to enhance the functionality of your website, you can count on WordPress. Let’s have a look at what is Stripe and how you can integrate it with WordPress.
What is the Stripe payment solution?
Stripe is a payment gateway that allows you to accept credit card payments by transferring money between your merchant account and a payment processor.
It is a payment gateway that will allow you to instantly start accepting payments on your website. Stripe is relatively new as compared to other payment gateways and it was launched in 2009. Let’s have a quick look at some of the advantages you can have with Stripe.
- It helps manage risks and fraud.
- It is compatible with CMS like WordPress and can be integrated using different ways.
- Stripe is a secure payment gateway that supports different cards, wallets, and bank transfers.
- It is also compatible with iOS and Android.
Integrate the secure payment gateway for e-commerce store
Integration of Stripe in WordPress
As we mentioned earlier, Stripe can be integrated with WordPress using multiple ways. Most of the online stores running on WordPress use WooCommerce. However, you can also integrate Stripe in different ways mentioned below:
- Integration with Gravity Forms
- Integration with WooCommerce
- Integration with Easy Digital Downloads
- Integration with a Form Plugin & Custom Fields
However, we are sharing a detailed tutorial to use Stripe with WordPress via WooCommerce.
Important Note: To communicate payment data securely, you must have SSL on your Stripe checkout page.
What do you need?
Here’s a list of things you need to start using Stripe with your online store. The process of integrating the Stripe payment gateway is fairly simple and you just need to follow the right steps.
- A WordPress website
- Stripe Account
- WooCommerce Plugin
- WooCommerce Stripe Payment Gateway Plugin
How to integrate Stripe via WooCommerce
Before you start the process of integrating Stripe with WordPress, make sure you have SSL enabled on your website. If you are running an online store on WordPress, then you must be using WooCommerce. Let’s get started with the process.
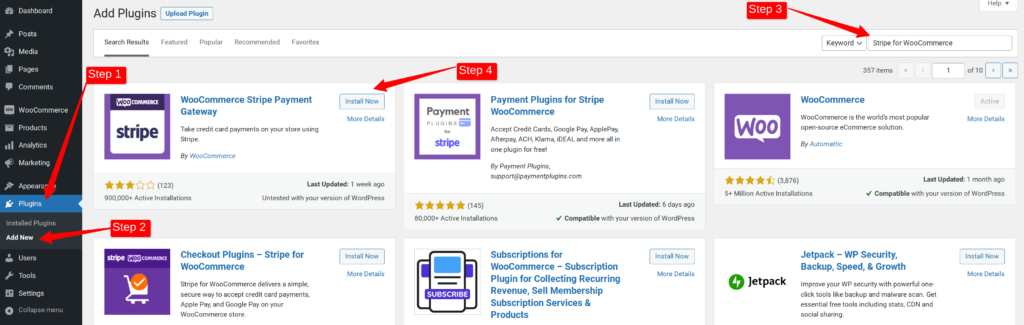
Installing Stripe for WooCommerce
The first step is going to be the installation of the WooCommerce Stripe Payment Gateway Plugin.
To do that, you will have to navigate to WordPress Dashboard > Plugins > Add New. Here, you will have to search for WooCommerce Stripe Payment Gateway in the search bar. You will be able to see the WooCommerce plugin for Stripe. You can then click, Install, and activate the plugin.
Configuring Stripe with WooCommerce
For connecting Stripe with WooCommerce, you will have to navigate to WordPress Dashboard > WooCommerce > Settings > Payments.
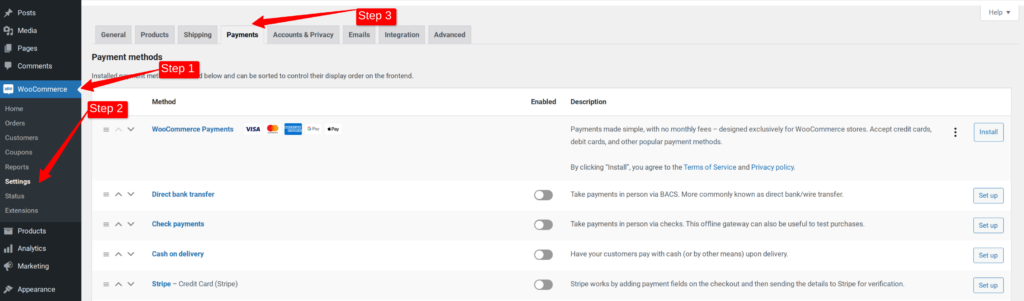
By visiting the payments tab in WooCommerce settings, you will be able to see an option to enable the Stripe payment gateway. You can turn on the Stripe connection in the payments tab and set it up.
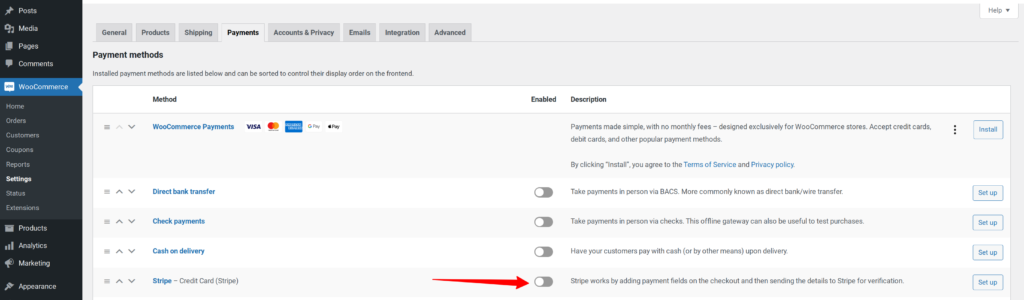
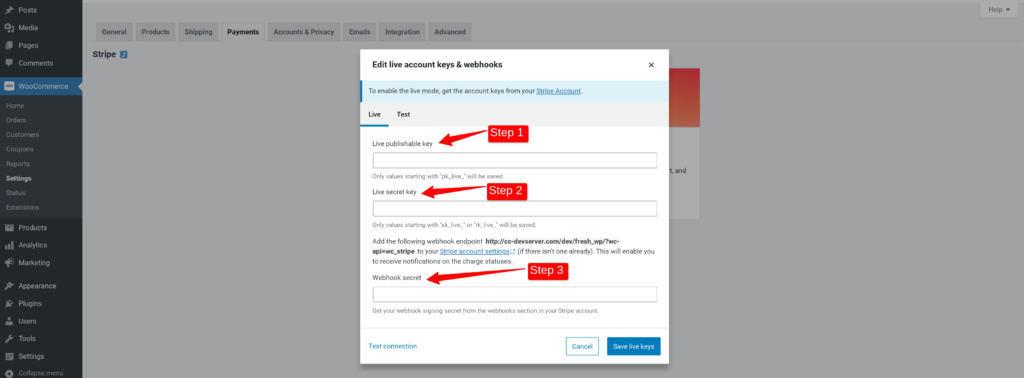
After turning on the Stripe button, you will be asked to ‘Enter Keys’. You can click on the button for entering keys.
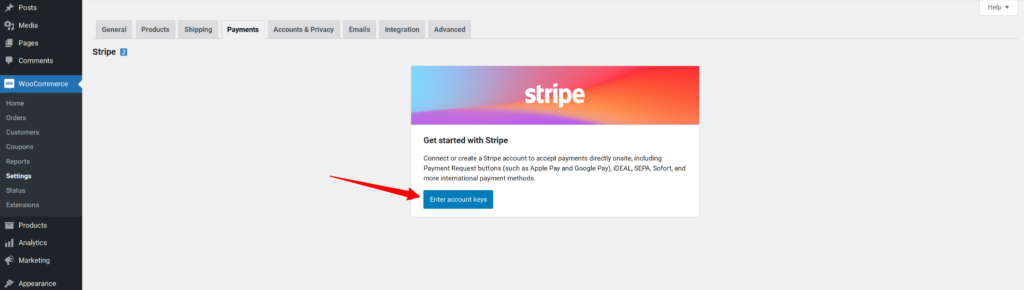
After clicking the button, a pop-up window will open. In this window, you can enter the keys. You can get your keys by visiting your Stripe account. If you don’t have a Stripe account, it is time to create a Stripe account.
You can get your Stripe keys by visiting your Stripe account. You can log in to your Stripe account and navigate to the Developers Tab.
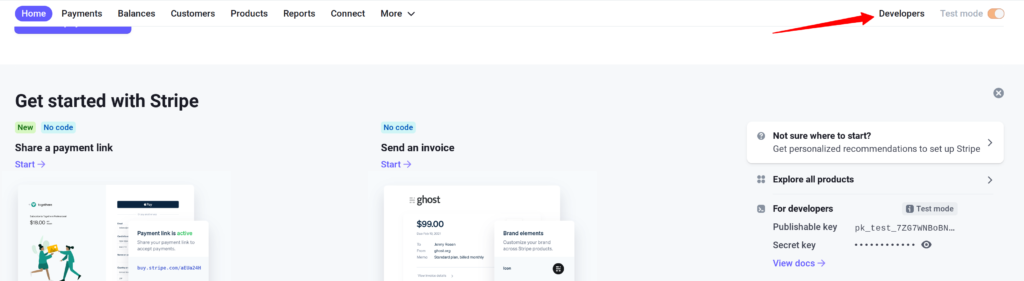
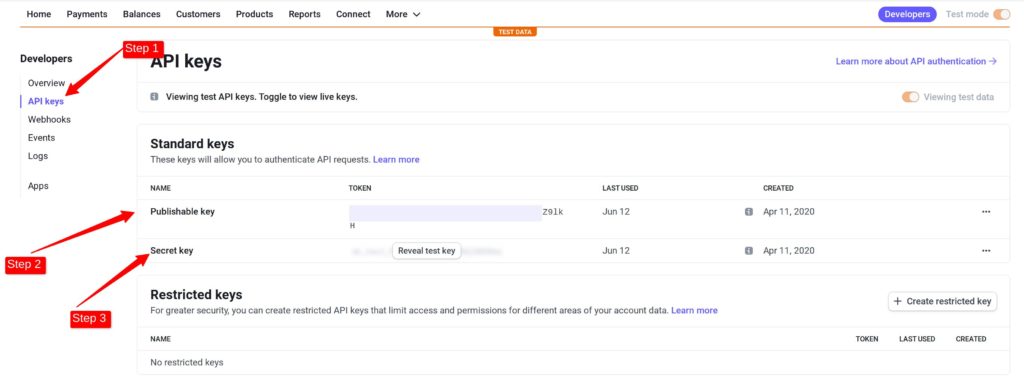
Once you click the Developers Tab, you will be able to see a sidebar menu. Here, you can click on API Keys to copy your Stripe keys.
You will also have to add a webhook secret that you can get by following the instructions given to you via a pop-up message. In a pop-up message, you can click on the link that says, ‘Stripe Account Settings’ and it will take you to Stripe account settings where you can configure the webhook secret.
After clicking this, a new tab will open that will take you to your Stripe account. Here, you will have to enter the endpoint URL (Your website), After that adding the endpoint, you can copy the webhook signing secrete from Stripe and add it to WooCommerce settings.
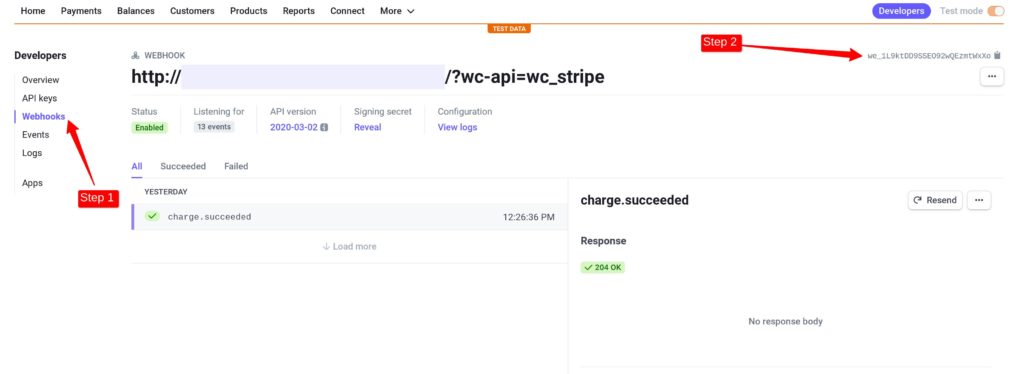
To get your webhook signing, you can again visit your Stripe account > Developers > Webhook. Here, you can copy your webhook signing secrete.
After adding the keys, you can now save settings.
After adding the keys, you will see a settings page. You simply have to save the page settings and test if Stripe is configured with your website.
Integrate the secure payment gateway for e-commerce store
Test if Stripe is working
Your Stripe account is now connected to your website. You simply have to test it. You can change the price of one of your products to $1 and make a test transaction to see if the Stripe is working. You can add the product to your cart and go to the checkout page to test it.
You can now click ‘Place Order’ and your transaction will be completed via Stripe.
You can now go to your Stripe account and check if the transaction is successfully made. You can go to Stripe dashboard > Payments tab to view the transaction.
Questions that people ask
Yes, you can integrate Stripe with WordPress without WooCommerce. There are multiple plugins including Gravity Forms & Easy Digital Downloads that you can use to connect Stripe with your WordPress site.
Yes, you can use multiple payment gateways with WooCommerce. You can use PayPal, Square, Stripe, and others at the same time with your WooCommerce store.
Yes, Stripe accepts credit and debit cards. Stripe is one of the most popular payment gateways and it gives excellent choices to store owners.
Conclusion
Stripe has gained popularity since its launch. It gives some excellent choices to the store owners and works perfectly well with WooCommerce. If you are running an online store on WordPress, then you can use Stripe in multiple ways.
You don’t only need to have an online store for using Stripe. If you are running an LMS or selling digital goods, then you can also use Stripe with WordPress. If you are finding it difficult to set up Stripe with your WordPress site, then connect with our WordPress maintenance team and they will help you set it up nicely.
Leveraging WooCommerce to Transform WordPress Sites to E-Commerce Stores
November 19th, 2019It is common knowledge that a majority of websites active on the internet today are created using the WordPress CMS. the reason for that is simple. WordPress is easy to use and free. Its incredibly user-friendly and can be set up by anyone even if they have minimal technical knowledge. Even though many platforms are used today for creating e-commerce sites like Shopify, BigCommerce, and Magento, WordPress is still being used by many online retailers or companies that even occasionally sell products through their website.
In this post, we will outline some of the steps that you need to follow to successfully set up and launch your new e-commerce site using WordPress.
Step 1) Get Hosting
There are several hosting providers that you can choose from including Hostgator, Bluehost, GoDaddy, etc. Go over all their hosting plans and choose the one that suits your hosting requirements. Compare costs as well as their customer support before making a decision and always check customer reviews.
Step 2) Choose a Domain Name
Your domain name should be something that represents your business. It should also be memorable so that in the crowded internet space and the competitive e-commerce sector, your site can stand out. You can do some keyword research for this purpose to see what are some catchy terms related to your products that people are searching for in your target area. If you want to, we suggest registering all domain extensions like .com, .net, .us, etc to fend off copy cats.
Step 3) Install WordPress
Following the instructions shared by your hosting provider, you can log in to your Cpanel and install WordPress. After the successful installation of WordPress, you can log into your WordPress dashboard using your credentials. It is advised to keep the credentials to your Cpanel as well as your WordPress dashboard private.
Step 4) Set up WooCommerce
WooCommerce takes a WordPress website and helps by transforming it into a fully functional e-commerce store. The steps for setting it up are simple and given below –
- Download and install WooCommerce. Answer the questions in its setup wizard for an easy set up within minutes.
- Choose a theme that is compatible with WooCommerce and proceed to install it.
- Once that is done, you will get an option to add products on the dashboard of your site. Click on add new product and follow the steps to add your first product.
Step 5) Choose a Theme
If the theme you are already using on your WordPress site is not compatible with WooCommerce or you are looking to update the theme, you can choose from a wide range of themes that are perfectly compatible with WooCommerce. Some of the best free WooCommerce themes are – TheShop, ShopIsle, eStore, Storefront, and Easy Commerce. There are several premium themes you can choose from too if you are not satisfied with the free ones.
Step 6) Set up Pages
If you are setting up a new site instead of converting an existing WordPress site to e-commerce, then you need to set up all the required pages like Home, About, Shop, products, Blog, Cart, Thank-you, etc. Even if you did have a working WordPress site before adding WooCommerce, some pages that are unique to e-commerce stores like the Shop and cart pages would still need to be set up.
Step 7) Optimize for SEO
After your e-commerce store is launched, the next step is to focus on its SEO. The first thing to do is install and activate the Yoast SEO plugin. It is considered one of the best SEO plugins and it is free. Then continue to customize its settings as per your requirement. Yoast can then be used to add Meta-Titles and Meta-descriptions to every single page and product. Sitemaps, robots.txt files can also be created using Yoast. There is also an alternate option to Yoast called All in one SEO pack which you can use if for some reason you do not wish to use Yoast.
Conclusion:
The above steps outline the general process for turning your WordPress site into an e-commerce store. It is suggested that you hire a WooCommerce development company with years of experience in creating successful e-commerce stores for your online store. This will give you the help ofcertified professionals that know what achieving e-commerce success consists of.
Magento vs. Shopify vs. PrestaShop Twitter Audiences Survey
June 4th, 2016The importance of social media is high for each brand, as most of us contact followers with promotions, important notifications, feedback requests, and some brands even provide customer service via social media.So, we asked ourselves a question: “What are the differences of social audiences of main e-commerce platforms? Do they have something similar? Perhaps, they have some overlaps or similar locations, or anything else?” The presented below survey is designed to address these questions.
The survey covers the Magento Twitter audience, which is one of the most important social media for the platform, compared to the PrestaShop and Shopify Twitter accounts.
Key findings of the survey are given at the end of this post.
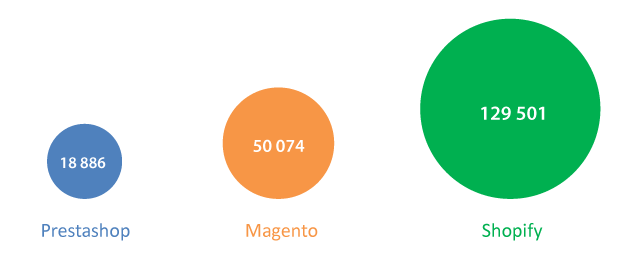
General Information

Magento is the oldest Twitter inhabitant, but much less active than Shopify, for example. Shopify also has the best followers/tweets ratio. Each tweet brings Shopify 9.2 followers per tweet, while Magento gets 8.4 followers, and PrestaShop -2.3.
Audiences Overlaps: –
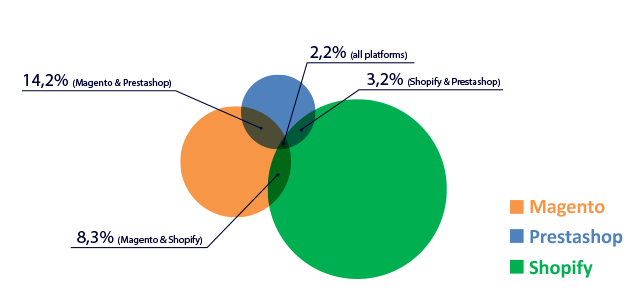
We analyzed 10 thousand followers from each account and determined that the audience of these three platforms has considerable overlaps:
- PrestaShop & Shopify – 3.2%;
- Magento & Shopify – 8.3%;
- Magento & PrestaShop – 14.2%;
- All platforms – 2.2%.
The overlap of the Magento and PrestaShop audiences is the biggest and mostly presented by digital companies and developers, according to the randomly chosen sample from the mutual 14.2% scope.
- Marketers – 10%;
- Developers – 20%;
- Digital companies – 25%;
- Non topical – 15%;
- Abandoned – 15%;
- Other – 15%.
All three platforms have 2.2% of followers, who follow all the platforms at the same time. We analyzed a 10% sample of randomly chosen following accounts from that array, and got the next results:
- Abandoned accounts – 40%;
- Digital companies – 15%;
- Independent developers or consultants – 25%;
- E-commerce news – 5%;
- Other – 15%.
The quantity of abandoned accounts is significant in this sample and makes up to 40%, but we can disregard them. The companies and independent developers working at the junction of platforms or with all three platforms simultaneously constitute 40% of the total quantity, and this is the main relevant group.
Main Interests of the Audiences: –
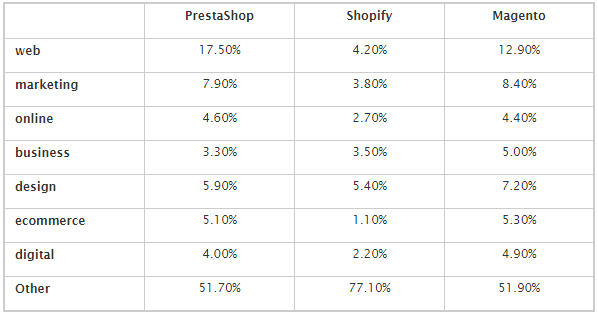
As you see, Magento and PrestaShop Twitter followers are interested in almost the same topics and to the same extent. Their followers like “web” and “marketing” topics, while the Shopify audience subjects of interest are more diversified and directed towards “design” issues.How can we explain those similarities of Magento and PrestaShop Twitter followers? Clearly, the platforms themselves and their peculiarities can explain this phenomenon.
Magento and PrestaShop are both open-source e-commerce solutions written in PHP, what allows PHP developers work with them both extending their functionality. While Shopify is a SaaS e-commerce platform designed for SEM businesses and mostly attracts theme designers.
So, now we know that Magento and PrestaShop twitter followers have much similar and the Shopify Twitter audience differs from them in many aspects. But we can find out even more insights about those audiences, which greatly present the entire platform business communities.
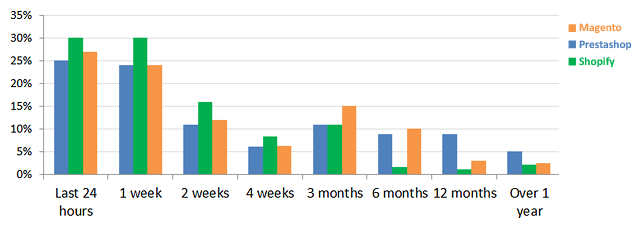
Audiences Activity: –
Audiences Distribution by Time Zones: –
45% of the PrestaShop Twitter audience is located near Paris, Berlin, Amsterdam, Rome, Madrid, Stockholm, and some other nearest European cities, while other locations are minimal for this platform.
The Magento audience is primarily described by three main geographical areas: Western Europe, the U.S., and northern India, near New Delhi. The European area of Magento is more widely distributed to the west and east, compared to PrestaShop, and the Eastern Time zone is the most popular in the U.S. for Magento.
The same as Magento, Shopify is interesting for New York, Ohio, Pennsylvania, Georgia, North Carolina, New Jersey, etc. residents, however, the Indian share it has is three times larger than Magento has in that region. Perhaps, it is explained by the policy of the platform striving to get leadership in India and South Asia.
Conclusion: –
Key Findings: –
- Shopify is the most active on Twitter;
- Each tweet brings Shopify 9.2 followers per tweet, while Magento gets 8.4 followers, and PrestaShop -2.3;
- Magento and PrestaShop Twitter audiences overlap by 14.2%;
- All three platforms have the 2.2% Twitter audiences overlap;
- Magento and PrestaShop have almost the same structure of their Twitter audiences interests primarily addicted to “web” topics;
- The Shopify Twitter audience is the most active on Twitter;
- Magento and PrestaShop followers post in the same manner by the frequency of posting;
- PrestaShop is popular among users from Paris, Berlin, Amsterdam, Rome, Madrid, Stockholm, and some other nearest European cities;
- The Magento audience is primarily located in Western Europe, the U.S., and northern India, near New Delhi;
- Except the U.S. and Western Europe, the Shopify Twitter account is very popular in India, much more than Magento and PrestaShop accounts.
Note: The data is obtained using Simplymeasured.com